

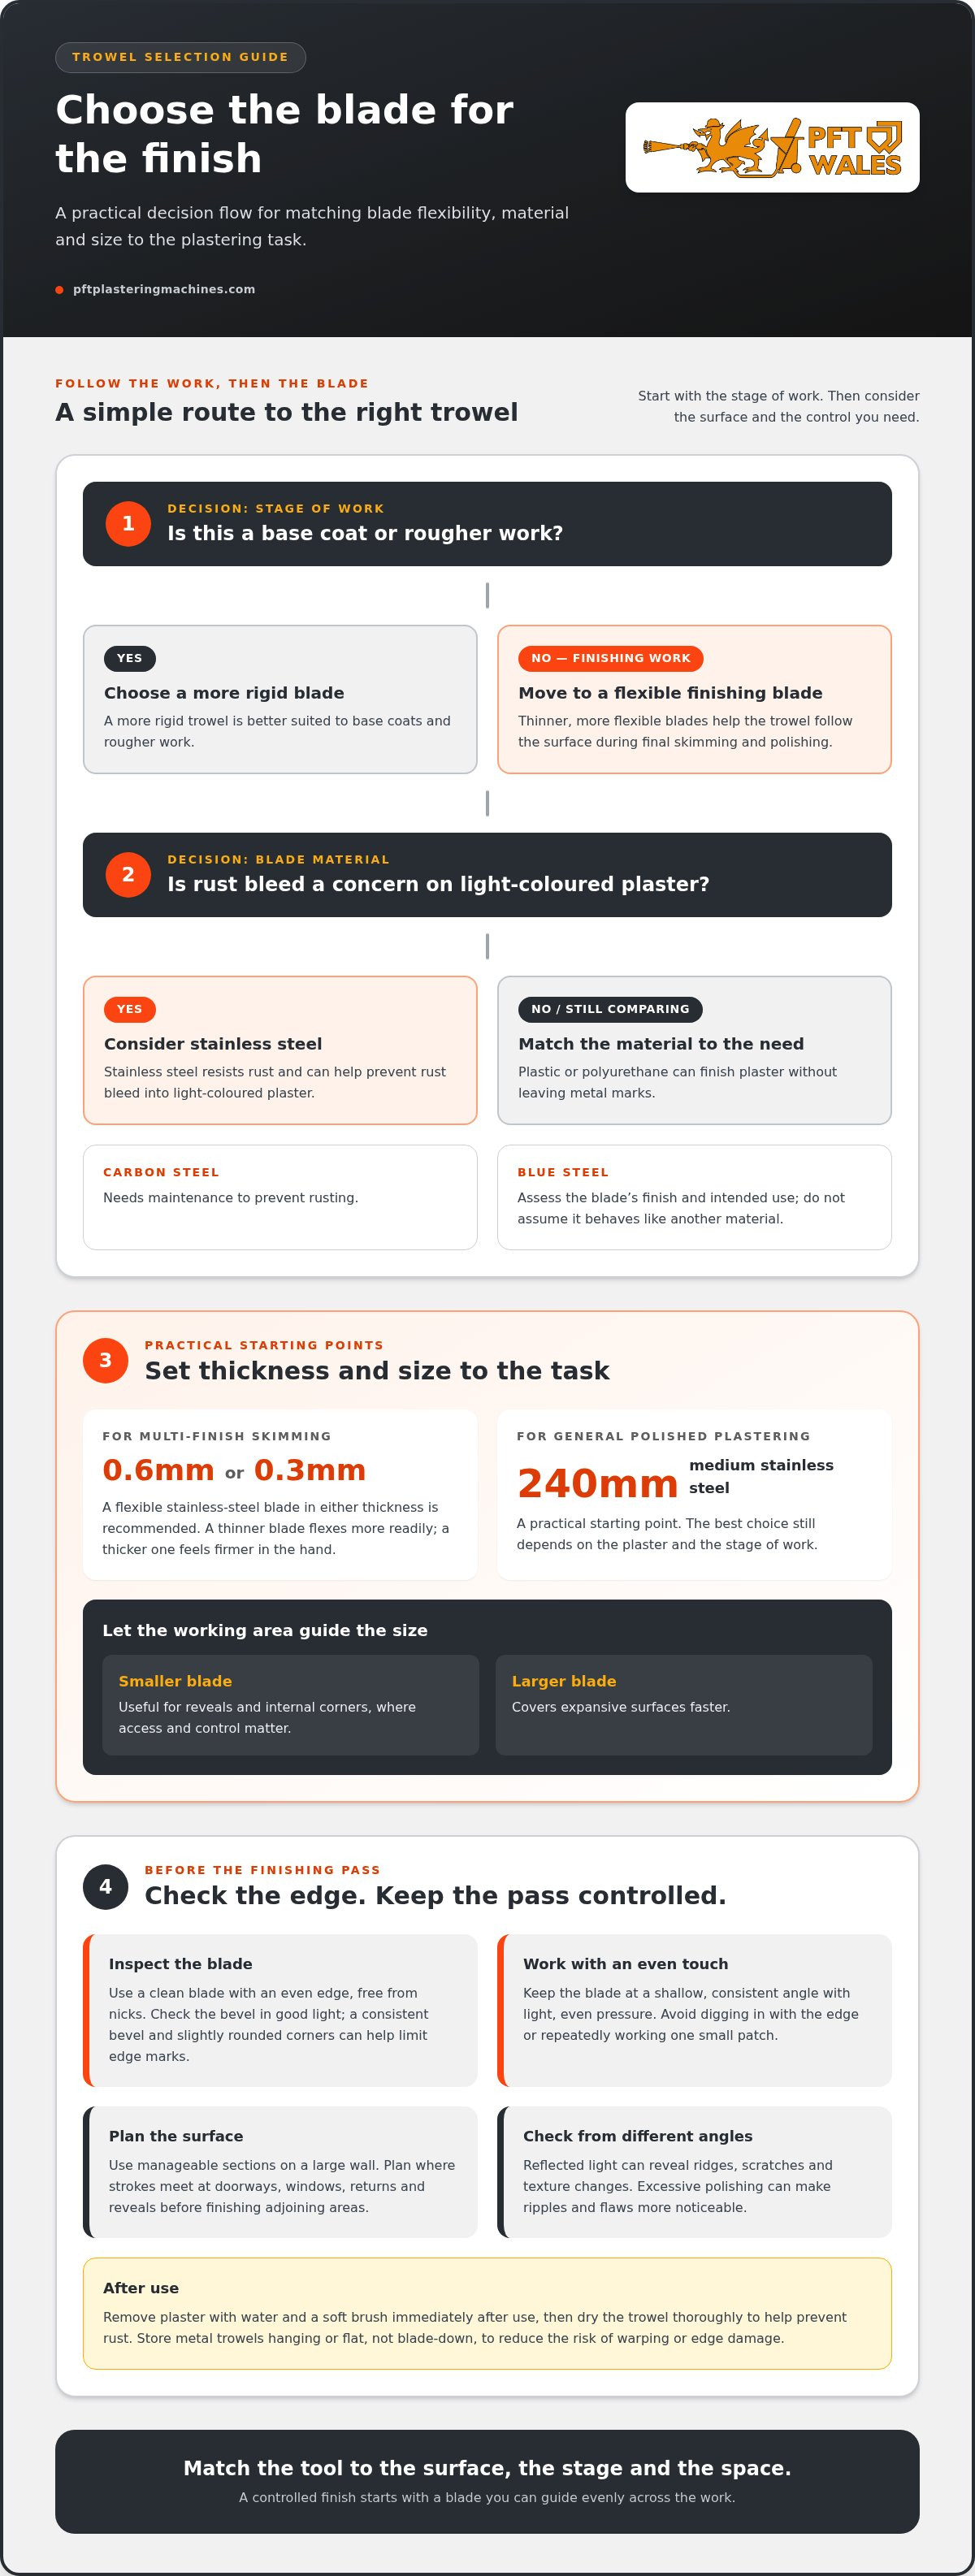
For general polished plastering, a 240mm medium stainless steel trowel is a practical starting point. The best trowel for a glass-like plaster finish depends on the plaster and the stage of work, but a smooth, flexible blade gives you more control during skimming and final polishing.
A glass-like plaster finish takes more than extra pressure at the end. Blade material, flexibility, shape and corner profile all affect how the trowel moves across the plaster. Choose the wrong tool and you can leave marks or make imperfections more noticeable.
This guide compares stainless steel, carbon steel and plastic blades, explains which trowels suit skimming and polished finishes, and covers what to consider with acrylic Venetian plaster. The aim is to help you match the tool to the finish, rather than relying on one trowel for every job.
Key Takeaways
- Match blade flexibility to the job: a flexible finishing trowel suits skimming and polishing, while a more rigid blade is better for base coats.
- For multi-finish skimming, consider a flexible stainless steel blade that is 0.6mm or 0.3mm thick.
- For acrylic Venetian plaster, a trapezoid trowel with rounded corners can help reduce scratching during burnishing.
- Choose trowel size for the working area: smaller blades help with reveals and internal corners, while larger ones cover expansive surfaces faster.
- Explore PFT Wales’ plastering and rendering tools, including trowels, spatulas and floats, to find tools suited to your finishing work.
Stainless steel, carbon steel, blue steel and plastic blades
Blade material affects how the trowel meets the plaster, while flexibility influences control during finishing. Match both to the surface and stage of work, then keep the blade clean and its edge in good condition.
For a practical comparison of stiff and flexible blades in use, watch this video:
Blade material selection
Stainless steel, carbon steel, blue steel and plastic each offer a different option. Stainless steel resists rust and can help prevent rust bleed into light-coloured plaster. Carbon steel needs maintenance to prevent rusting. Plastic or polyurethane can finish plaster without leaving metal marks. With blue steel, assess the blade’s finish and intended use rather than assuming it behaves like another material.
Flexibility and surface polishing
Finishing trowels have thinner, more flexible blades than standard plastering trowels. That flex helps the blade follow the surface during final skimming and polishing. A flexible blade suits finishing; a more rigid trowel is better for base coats and rougher work. Choose a blade you can move evenly without forcing its edge into the plaster.
Polished blades and bevelled edges
A polished stainless-steel blade offers a smooth face for finishing and burnishing. Check that its edge is even and free from nicks, which can leave lines across a polished surface. Inspect the bevel in good light to make sure it is consistent. Slightly rounded corners can help limit edge marks, particularly when changing direction.
For multi-finish skimming, a flexible stainless-steel blade measuring 0.6mm or 0.3mm thick is recommended. A medium stainless-steel trowel measuring 240mm is a practical choice for general polished plastering. The right thickness depends on the control you need: a thinner blade flexes more readily, whilst a thicker one feels firmer in the hand. The plastering trowels range brings together tools for different finishing tasks.
To help prevent scratches and burn marks, keep the blade at a shallow, consistent angle and use light, even pressure. Avoid digging in with the edge or repeatedly working one patch, as both can mark the surface.
Common mistakes include using a nicked blade, pressing too hard and polishing unevenly. These can cause scratches and burn marks, while excessive polishing can make ripples and flaws more noticeable. Keep the blade clean during the job, then remove plaster with water and a soft brush immediately after use.
Inspect the edge before each pass, then dry the trowel thoroughly after washing to help prevent rust. Store metal trowels hanging or flat, not blade-down, to reduce the risk of warping or edge damage. A clean, sound blade gives you better control during finishing.
Choosing trowels for skimming and polished finishes
Choose a trowel based on the area’s shape, available access and stage of the finish. A broad, uninterrupted wall allows longer strokes; a reveal, corner or return needs a tool you can steer precisely. Plan the whole surface before starting so a tool change does not interrupt a consistent finish.
For skimming, consider how the blade will travel across the wall. A trowel that is too wide for an alcove or narrow return can force awkward wrist movements and uneven overlap. A compact blade, on the other hand, takes more passes across an open area. Match the working edge to the space and keep a second tool handy for awkward transitions.
Polished work calls for a planned route across the surface. Divide a large wall into manageable sections and work systematically, connecting each pass to the last. At a doorway or window, plan how the strokes will meet at the reveal before finishing the main area. This helps avoid rushed corrections where sections join.
Look at the wall from different positions as you work. Reflected light can reveal ridges, scratches and texture changes that are less obvious when viewed straight on. Check the surface before moving on, while the working pattern is still easy to adjust. Avoid repeated passes over one small patch, which can make local differences stand out.
Choose corners and edges suited to the details. Rounded corners can reduce the chance of catching the surface when changing direction, while a clean edge helps prevent drag marks. Before starting, check the blade for dried residue or damage. Tool marks can be conspicuous across a smooth finish, especially where light crosses the wall.
- Open wall: plan continuous strokes across manageable sections.
- Returns and reveals: choose a tool that reaches the detail without awkward handling.
- Transitions: decide where adjoining passes will meet before finishing each area.
- Final inspection: view the surface from changing angles to spot ridges or texture differences.
There isn’t one blade that suits every wall. The best trowel for a glass-like plaster finish is the one that lets you work the whole area consistently, including its edges and transitions. If you’re weighing up trowel options for a particular job, discuss your trowel requirements with the team.
When choosing a tool, consider the intended finish, the wall’s shape and the available access. A finishing trowel with slightly rounded corners can help prevent edge marks, making it useful where strokes turn or meet a detail, provided the blade is manageable for the area. Choose for the specific section rather than assuming one trowel will suit the whole job.
Before working across the full surface, consider how the blade will move at boundaries and where passes connect. If a trowel is awkward to guide near a return, use a more manageable option for that section, then continue consistently across the broader area. Matching the tool to each part of the wall helps keep the work controlled, especially at transitions where direction changes.
Stainless-steel and carbon-steel plastering trowels
Choose between stainless steel and carbon steel based on the plaster colour, the task and how you manage tools between passes. Stainless steel resists rust and can help avoid rust bleed into light-coloured plaster. Carbon steel needs maintenance to prevent rusting. These differences make the working conditions and finish requirements useful starting points.
With a light-coloured finish, rust bleed is a particular concern, so stainless steel offers a practical advantage. If using carbon steel, keep up with blade maintenance rather than leaving it until the end of the job. Material alone does not determine the finish: the blade must also be clean, even and suited to the work.
Before using a steel trowel on a visible area, check its face and working edge in good light. Look for dried plaster, rust spots or nicks that could leave marks. Make a controlled pass on a less prominent part of the surface and assess the result before continuing across the main wall, especially if it will catch reflected light.
Consider how each tool will be used across the job. A trowel used for rougher work may pick up residue or edge damage that makes it unsuitable for a final pass. Keep the finishing tool separate from tools used for other tasks, and inspect it before returning to polished areas. This helps prevent tool marks before they appear across a full wall.
Tool care should inform your material choice. Carbon steel needs attention to prevent rust, while stainless steel’s rust resistance can be useful with pale plaster. After washing either metal blade, dry it thoroughly. Store metal trowels hanging or flat, not blade-down, to help prevent warping or edge damage.
- Light-coloured finish: consider stainless steel to help avoid rust bleed.
- Carbon-steel tool: include rust prevention in the regular care routine.
- Before finishing: inspect the face and edge, then assess a controlled pass.
- Between tasks: keep the tool intended for polished work clear of rougher jobs.
No single steel suits every plasterer. Match the blade to the colour and finish, then maintain its working condition throughout the job. Regular checks can catch a damaged or marked edge before it affects a larger area.
Trowel choice for acrylic Venetian plaster
For acrylic Venetian plaster, prioritise control during smooth finishing. Keep one trowel dedicated to smooth work and another for other tasks, as Protek advises. This gives the finishing tool a consistent role and helps prevent residue from other work reaching the surface.
A plastic trowel is one finishing option for acrylic Venetian plaster. Some applicators prefer plastic for the final work instead of using the same tool at every stage. The key question is whether you can guide the blade evenly and maintain control as you finish. Choose for the task, not simply because a blade is labelled for Venetian plaster.
Blade length affects coverage and handling. Trowels measuring 14 inches or more cover more area quickly, but are harder to control. On a broad, open wall, that reach can help you work across more surface with each movement. In a confined section or around detailed transitions, a long blade can be less manageable. Base the choice on access and the accuracy the finish demands.
Plan your tools around the work instead of expecting one trowel to do every job. Set aside the smooth-work tool before starting and keep it apart from the tool used for other tasks. This is especially useful when the final finish needs a dedicated tool and consistent handling. Use the second trowel for general work, keeping the finishing tool for the smooth surface.
- Dedicated finishing: reserve one trowel for smooth work, following Protek’s advice.
- Plastic option: consider a plastic trowel for finishing acrylic Venetian plaster.
- Long blades: choose a blade of 14 inches or more for coverage only when you can control its reach.
Before using a long blade across a full wall, assess how it handles in the space. A tool that covers more area can still be the wrong choice if its length makes controlled movement difficult. A manageable blade can help you work deliberately in smaller areas without wrestling the tool.
For acrylic Venetian plaster, choose a tool you can control for the finish and keep a separate trowel for other tasks. Consider how much coverage the area needs, then balance that against handling. The longer the blade, the more important that balance becomes.
One forum contributor recommends a plastic trowel for finishing, based on their own experience, and says they have not had a decorator complain about that approach. Once a polished feature wall is ready for interior styling, whether left bare or paired with canvas art from Panther Print, having a clean, blemish-free foundation ensures the entire room looks its best.
Types of plastering and finishing trowels
Choose trowel size to suit the work, rather than reaching for the same blade every time. A tight reveal needs a different tool from a commercial ceiling, while a long finishing trowel suits broad, flat areas. Consider access, coverage and how much control the surface demands.
For base coats, plastering trowels are typically 11-14 inches long. This size range gives a useful starting point for covering walls and ceilings during the earlier stages. In tighter spaces, smaller plastering trowels measuring 11-13 inches are easier to control. They can also suit beginners who are building a consistent hand movement before working with a larger blade.
Detail work needs a more compact tool. Small plastering trowels measuring 40mm-140mm are recommended for reveals and internal corners, where a full-size blade can be awkward to manoeuvre. Choose within that range according to the space: a narrow reveal needs less blade width, while an internal corner requires an edge that can reach in without catching the adjoining surface. Keep the tool aligned with the detail rather than forcing a larger trowel into position.
For large commercial walls and ceilings, a 280mm plastering trowel is recommended. The wider blade covers more surface with each pass than a small detail trowel, making it suited to expansive areas. That coverage only helps if you can guide the blade evenly. If a room has narrow returns or several internal corners, keep a smaller trowel close for those transitions instead of relying on the 280mm blade throughout.
Long finishing trowels serve a different purpose from compact plastering trowels. Polycarbonate long finishing trowels are available in lengths up to 18 inches, with blade thicknesses of 1mm, 1.5mm and 2mm. Their longer format covers a broader path across a flat surface. The thickness options let you compare blade feel and choose a tool that you can control through the finishing pass. Don’t assume the longest blade is automatically the right choice for every wall.
- Reveals and internal corners: select a small 40mm-140mm plastering trowel.
- Base coats: compare typical 11-14-inch plastering trowel lengths with the space.
- Commercial walls and ceilings: consider a 280mm plastering trowel.
- Broad finishing passes: assess polycarbonate blades up to 18 inches long.
Use the smallest blade that gives clean access to a detail, then move to a wider tool where coverage matters. If you’re selecting between trowel types for a particular job, ask about suitable plastering trowels.
PFT Wales: PFT Plastering & Rendering Machines
PFT Wales supplies PFT plastering and rendering machines, as well as tools for plastering and finishing. If you’re choosing a trowel for skimming or a polished finish, compare the Plastering & Rendering Tools - Trowels, Spatulas & Floats and Skimflex Professional Plastering Tools ranges to find options for your working kit.
PFT Wales also supplies PFT machine parts, spares, rotors and stators. Part selection depends on the machine, so seek technical advice on compatibility rather than assuming parts fit across different equipment.
Contact PFT Wales for help choosing tools or advice about PFT equipment.
Choose your next tool with the finish in mind
Choose your next trowel based on the work you do most, then consider whether your kit needs a dedicated tool for specialist finishes. The best trowel for a glass-like plaster finish is one that suits the surface and gives you control through the final passes, not simply the largest or most flexible blade.
If you’re reviewing equipment alongside your hand tools, PFT Wales supplies PFT plastering and rendering machines, Refina professional plastering and rendering tools, and Skimflex professional plastering tools. These options cover different parts of a plastering setup, from machine work to hand finishing.
Bring your finishing requirements into the conversation before choosing your next tool. Contact PFT Wales about plastering tools and equipment and take the next step with a clearer idea of what suits your work. A considered tool choice helps you approach each finish with purpose.
Frequently Asked Questions
Which trowel types are best for achieving a glass-like plaster finish?
The best trowel for a glass-like plaster finish is a smooth finishing or burnishing trowel suited to the plaster and working area. For Venetian plaster, a trapezoid blade with rounded corners can help limit scratching during burnishing. A plastic finishing trowel is another option when metal marks are a concern. Keep a separate, clean tool for the final passes so residue or damage from other tasks does not transfer to the finish.
What is the difference between a Venetian plaster trowel and a standard plastering trowel?
A Venetian plaster trowel is designed for controlled finishing and burnishing, while a standard plastering trowel is commonly used to apply and work plaster. A trapezoid Venetian blade has a short blade support, giving its end greater flexibility, and rounded corners help reduce scratching. Use a standard plastering trowel for broader application work, then change tools for detail finishing.
Which trowel blade materials and sizes are best for polished plaster?
For general polished plastering, a medium stainless-steel trowel measuring 240mm is a practical starting point. Plastic or polyurethane blades can help avoid metal marks, making them worth considering for a final pass. On expansive, flat surfaces, a finishing or burnishing trowel measuring 240mm-280mm can cover more area. Choose the blade material and size for the plaster, surface and level of control required, rather than assuming one tool suits every finish.
Should you use a flexible or rigid trowel for a polished plaster finish?
Use a flexible trowel for skimming and final polishing, and a more rigid one for base coats or rougher work. For multi-finish skimming, a flexible stainless-steel blade measuring 0.6mm or 0.3mm is recommended. Flex helps the blade respond across the surface; it doesn’t replace a consistent hand or a sound edge. If the blade catches or leaves lines, inspect it before continuing rather than pressing harder.