

The right roller depends on the surface: external Tyrolean render needs a very long pile, while smooth plastered internal walls suit a very short-pile or foam roller. Brush bristles matter too. Shorter bristles give more control; longer ones hold more water for dampening.
With so many options, choosing plastering rollers, brushes and poles can feel like guesswork. The wrong pile can leave textured render uneven, while an unsuitable brush can make precise work harder. Match the tool to the surface and task rather than using one brush or roller for everything. This guide explains how to choose bristle type and length, select roller pile for different textures, and use poles and specialist rollers to make application more practical. You’ll also learn which tools suit smooth internal walls, awkward corners and applying bonding agents, so you can choose confidently for the job in hand.
Key Takeaways
- Match brush bristles to the task: shorter bristles give more control, while longer bristles hold more water for dampening.
- Let surface texture guide roller choice. Tyrolean render needs a very long pile; smoother walls generally suit a shorter one.
- For smooth plastered internal walls, consider a very short-pile or foam roller to keep the finish suitable for the surface.
- Use a sash brush for narrow corners and awkward profiles, and an angled sash brush for precise cutting-in on flat surfaces.
- A pole can help apply bonding agent from further away, while smaller strokes can help keep the application even.
Choosing natural or synthetic brush bristles
Choose bristles according to the material and the control the task requires. Short bristles give a firmer, more controlled stroke, which helps around a pipe, corner or narrow reveal. Longer bristles hold more water, making them useful for dampening a surface before plastering. For a small area, a narrower brush helps keep the bristles within the working edge and limits unwanted drips.
Synthetic bristles suit water-based paints and varnishes. They don’t swell significantly in water, so they’re less likely to leave brush marks in waterborne paint. They’re also easier to clean and generally wear more slowly than natural bristles. Their lower paint capacity can make them less efficient across a broad area, but it can help with controlled work, such as coating a short length of trim.
Natural bristles hold more paint, meaning fewer reloads across a large area. They can spread paint further on the first application and offer better control as the brush breaks in. Natural bristles suit oil-based glosses and varnishes, which aren’t absorbed into the bristles in the same way. In waterborne paint, however, natural bristles can swell and leave water marks. Match the brush to the product rather than choosing natural bristles simply because they feel familiar.
When choosing a brush, consider the width of the work, the material being applied and how much control the edge requires. A sash brush reaches narrow corners and awkward profiles, including spindles. An angled sash brush suits fine cutting-in on flat surfaces, such as skirting boards and panel doors. A broad brush covers larger areas efficiently, while a narrower head offers more control around sockets and fittings.
Handle design affects reach and handling. A short handle gives close control in a confined corner; a longer handle can keep the hand clear of a wet surface. Choose a shape that sits securely in a gloved hand and lets the wrist guide the bristle edge without twisting. For ceiling work, a pole-mounted roller keeps the applicator further from the user. What extension poles fit plastering rollers, and what lengths are available? The SkimFlex extension pole extends from 100 to 180 centimetres, and reaches up to 200 centimetres when combined with a SkimFlex roller.
After plastering work, rinse brushes immediately so plaster doesn’t harden in the bristles. Use lukewarm water; hot water can damage natural bristles. Work the rinse through the full bristle bundle, not just the tips. This clears residue from the inner bristles, where dried plaster can stiffen the brush and reduce control on the next job.
Roller pile length and surface texture
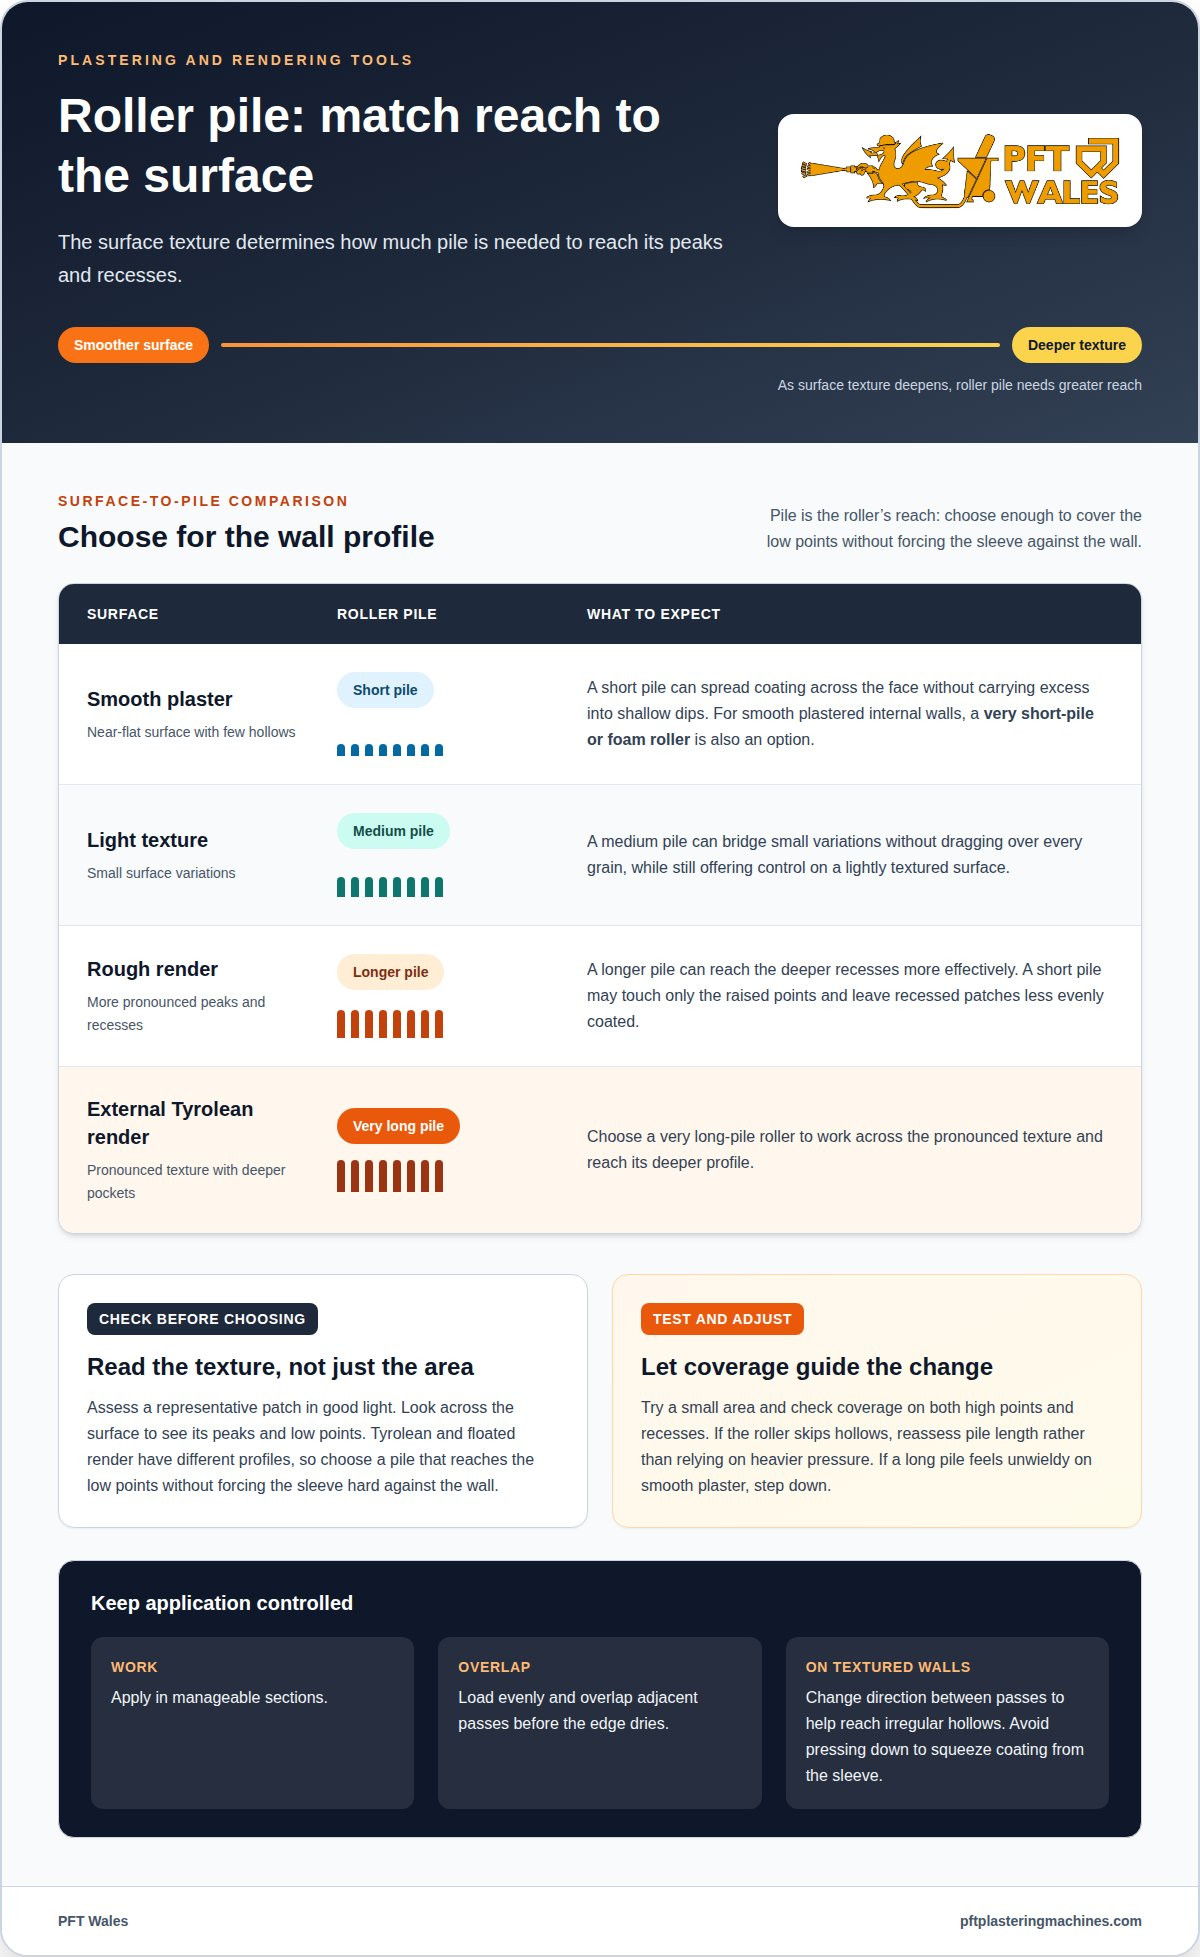
Match roller pile to the depth and shape of the surface, not just its area. A smooth wall has few hollows, so a shorter pile can spread coating across its face without carrying excess into shallow dips. Rough render has deeper peaks and recesses, which a longer pile can reach more effectively. For external Tyrolean render, choose a very long-pile roller to work across the pronounced texture.
Think of pile as the roller’s reach. On a lightly textured surface, a medium pile can bridge small variations without dragging over every grain. On heavily textured render, a short pile may touch only the raised points, leaving recessed patches less evenly coated. A very long pile helps reach those recesses, but can feel less controlled on a flat internal wall. In general, the smoother the surface, the shorter the pile can be.
Before choosing, assess a representative patch in good light. Look across the surface rather than straight at it. A Tyrolean finish has peaks and deep pockets; floated render has a different profile, with shallower marks. Choose a roller that reaches the low points without forcing the sleeve hard against the wall. Pressure alone won’t make an unsuitable pile reach evenly, and too much pressure can make application harder to control.
- Smooth plaster: choose a short pile suited to the near-flat surface.
- Light texture: use enough pile to cover shallow variations without losing control.
- External Tyrolean render: choose a very long pile to reach its deeper profile.
Coating consistency and technique matter too. Work in manageable sections, load the roller evenly, then overlap adjacent passes before the edge dries. On textured external walls, change direction between passes to help reach irregular hollows. Avoid pressing down to squeeze coating from the sleeve. If the roller skips over recesses, reassess the pile length rather than relying on heavier pressure.
Surface type should guide your choice, but a small test area shows how the sleeve behaves on that particular finish. Check coverage in the recesses and on the high points, then adjust the pile if the roller misses either. If a short pile leaves Tyrolean hollows untouched, for example, move to a longer pile. If a long pile feels unwieldy on smooth plaster, step down.
Rollers for smooth plastered internal walls
On smooth plastered walls, a very short-pile or foam roller can apply paint across broad areas. The flatter surface needs less pile to reach its shallow texture. A long-pile sleeve may carry more coating than the wall needs, making application harder to control. Choose a roller that sits evenly against the plaster rather than one intended for deep external render.
Roller width affects coverage and handling. A wider sleeve can speed up work on an open section, such as the centre of a bedroom wall. A narrower roller is easier to guide beside a window reveal, radiator pipe or internal corner. Larger rollers cover more area per pass, while smaller ones offer better control in restricted spaces. Match the width to the room’s layout, not just its wall area.
Foam and very short-pile sleeves are both options for smooth internal plaster. Test the chosen sleeve with the coating on a small patch beside a doorway. Inspect the finish under the room’s lighting for missed strips, uneven coverage or unwanted texture. This also shows whether the roller distributes the material consistently before you cover the full wall.
Keep each pass consistent. Load the roller evenly, spread the coating across a manageable section, then overlap the next pass while the working edge remains wet. Don’t press harder to compensate for a sleeve that isn’t distributing paint evenly. For a large wall, divide the work into sections you can manage without leaving a dry boundary. Use a brush where the roller cannot sit flat.
How do you clean and store plastering rollers and brushes after use? Remove excess material promptly, then clean each tool according to the coating’s instructions. Rinse plastering brushes immediately with lukewarm water. Let tools dry fully before storing them, so damp sleeves and bristles aren’t packed away together.
What safety precautions apply when plastering with rollers and extension poles? There isn’t one universal precaution for every roller and pole; safe use depends on the equipment and working conditions. Follow the instructions supplied with the specific pole and roller.
Think of plastering rollers, brushes and poles as a combination for different parts of the same job. A pole-mounted roller extends your reach across a smooth ceiling, while using the roller by hand gives more control around sockets and narrow returns. A brush handles details the roller head cannot reach. Choose each tool for the access and finish required, then use a test patch to assess the coating before continuing.
A test patch is particularly useful in a room with mixed surfaces, such as smooth plaster beside a repaired area. The repair may absorb or show the coating differently from the surrounding wall. Check both areas under the same light and adjust your approach if their appearance differs. A considered selection of plastering rollers, brushes and poles helps manage the transition without relying on extra pressure or hurried passes.
The role of brushes in plastering
A plastering brush handles preparation and details that a roller or trowel can’t reach cleanly. Use one to dampen a surface, work around an awkward profile or apply a preparatory coating in a tight corner. A brush doesn’t replace a plastering trowel for laying on plaster; it’s for controlled application and access.
For narrow corners, a sash brush can reach where a broad head catches on adjoining surfaces. Its shape also suits spindles and other awkward profiles. An angled sash brush is useful for fine cutting-in on flat surfaces, including skirting boards and panel doors. Its angled edge, for example, helps follow the top of a skirting board without dragging the full brush width across the wall.
Choose a brush width to suit the area. A narrower head gives better control beside a socket or window reveal; a broader brush covers more open space with fewer strokes. For a small area such as a window frame, choose a brush slightly narrower than the area being painted. This keeps the bristles from overhanging the edge and causing drips. Keep the brush face aligned with the boundary, then use short strokes to guide material into corners.
How do you use a roller and brush to apply plaster evenly? Use the roller for broad, accessible areas and the brush for corners, edges and narrow returns. Plaster itself is spread with a plastering trowel; rollers and brushes suit preparatory liquids or coatings when the product allows their use.
On a large wall, a roller can cover the main face efficiently, while a brush reaches the internal angle beside a ceiling or door frame. Brush the edge, then roll the adjoining area so the applications meet neatly. Keep each section manageable and avoid leaving a heavy ridge where the tools overlap. A trim roller can also speed up work around sockets and light switches, reducing the time spent cutting in with a brush.
Brush choice also depends on what needs attention before plastering. Use the tip to reach a narrow junction rather than forcing the full brush head into it. For a broad, accessible patch, choose a wider brush. These distinctions let the brush handle detailed work while the roller covers open surfaces and the trowel forms the plaster finish.
After use, clean a plastering brush promptly so residue doesn’t harden between the bristles. Plaster left in the centre of the brush, for example, can stiffen the bundle and make the edge harder to control on the next job. Store the brush so the bristles retain their shape, ready for the next corner, reveal or preparatory coat.
Are plastering rollers suitable for applying PVA, primer or bonding agents?
Yes, a roller can apply PVA, primer or bonding agent across accessible surfaces, provided the product is suitable for roller application. A drip-free ceiling roller can be used to apply PVA to ceilings. For a small patch around a doorway, a brush may give better control at the edges, while a roller covers the open area faster. Follow the product instructions for preparation and application, as methods can vary between coatings.
Bonding agents can contain grit that settles while the container stands. Mix Bond-it every couple of rollerfuls to help prevent the grit from sinking to the bottom. Keep the mixture consistent as you work, particularly across a larger wall. Applying bonding agent in smaller strokes helps keep it even, rather than leaving heavy bands from long, uneven passes. Work steadily across each section, paying attention to where the strokes meet.
A roller on a pole keeps the bonding-agent applicator further from you. This can be useful when coating a ceiling or reaching a high section of wall. Choose a pole length that lets you guide the roller head with control, and keep strokes manageable. At a ceiling edge or tight corner, finish with a brush where the roller cannot meet the boundary cleanly.
Use the surface and product to guide your choice of applicator:
- PVA on a ceiling: a drip-free ceiling roller can apply the coating overhead.
- Bonding agent: use smaller strokes for a more even application.
- Grit-containing Bond-it: mix every couple of rollerfuls to keep grit from settling.
- Edges and corners: use a brush where the roller head cannot reach neatly.
A roller sleeve should suit the surface profile and the material being applied. On a broad, even wall, a roller can cover the area efficiently; around a reveal, a brush reaches the narrow return. If a bonding agent is difficult to roll, a small amount of water can be added to help it roll. Follow the specific product instructions, and don’t add water unless it’s appropriate for that bonding agent.
Work methodically so adjacent strokes meet before the coating becomes uneven. On a ceiling, maintain a consistent direction and watch for missed strips near fittings or room edges. On a wall, use shorter strokes around openings, then blend them into the larger rolled section. Keep the roller moving evenly rather than pressing harder to force material onto the surface. A brush is useful for details, but slower across a broad face.
Pair a roller with a brush for edges and a pole for overhead work within reach. The roller covers the main area; the brush handles details. This combination helps manage application across ceilings, walls and awkward junctions, while the product instructions determine how each coating should be prepared and applied.
PFT Wales: PFT Plastering & Rendering Machines
PFT Wales supplies PFT plastering and rendering machines, alongside tools and parts for professional plastering work. If your next job calls for mechanised plastering or rendering, explore the machine range as a practical next step after choosing hand tools for preparation and finishing.
For work around the machine, PFT Wales also supplies Skimflex professional plastering tools, including trowels, spatulas and floats. PFT machine parts, spares, rotors and stators support machine upkeep, and technical support is available for equipment questions. Suitability depends on the machine and component, so seek advice before choosing a part when compatibility matters.
Contact PFT Wales to discuss the machines, parts or tools suited to your plastering work.
Choose the right kit for the work ahead
Choose tools according to the surface and task, then consider how they work together across the job. A practical selection of plastering rollers, brushes and poles can make preparation and coating easier to manage, while detailed finishing is left to the appropriate plastering tools. Keep the sequence in mind: access, application and control all affect which tools belong in your kit.
For trade work beyond surface preparation, PFT Wales also supplies Refina Professional Plastering & Rendering Tools, alongside its machine and Skimflex ranges. Choose equipment to suit the work you carry out, rather than adding tools without a clear purpose. Browse the roller and brush range to find options for your next job, and keep building a kit that works hard on site.
Frequently Asked Questions
So many brushes and rollers; which tool suits your job?
Choose according to the material, surface and access. For a broad ceiling, a roller on a pole covers the open area; use a brush for the perimeter and tight corners. A narrow reveal calls for a sash brush, while a heavily textured external finish needs a roller with enough pile to reach its recesses. Follow the coating instructions as well as considering the surface.
What are plastering rollers and brushes used for?
Rollers and brushes apply preparatory liquids and coatings, including suitable primers, bonding agents and PVA. Rollers cover broad sections efficiently, while brushes reach junctions, edges and narrow profiles. For example, use a brush around a window reveal where a roller head cannot sit flat. Neither tool replaces a plastering trowel for spreading and finishing plaster; choose an applicator to suit the task and product.
Which rollers and brushes are suitable for applying plaster in the UK?
Rollers and brushes are generally used for preparation or coating, not for laying on plaster itself. Use a plastering trowel to apply and work the plaster. For preparatory products, choose an applicator suited to the surface and follow the product instructions. A roller can cover an accessible wall area, while a brush handles corners or narrow returns. This distinction helps prevent choosing a decorating tool for plaster application.
What roller nap length and brush type work best for plaster?
For applying coatings to a smooth plastered wall, a very short-pile or foam roller is suitable; textured surfaces need more pile to reach their profile. Brush choice depends on the detail: a sash brush suits narrow corners and awkward shapes, while an angled sash brush helps with precise cutting-in. Use separate tools for different materials and jobs to avoid transferring residue between coatings.
Which plastering roller and brush brands are recommended in the UK?
Skimflex plaster rollers are available in sizes from 3 to 12 inches, giving a choice for different working areas. REFINA plastering brushes are available in sizes from 4 to 7 inches. Consider the surface, access and applicator width before choosing, rather than relying on the brand name alone. PFT Wales also supplies Refina Professional Plastering & Rendering Tools and Skimflex Professional Plastering Tools.