

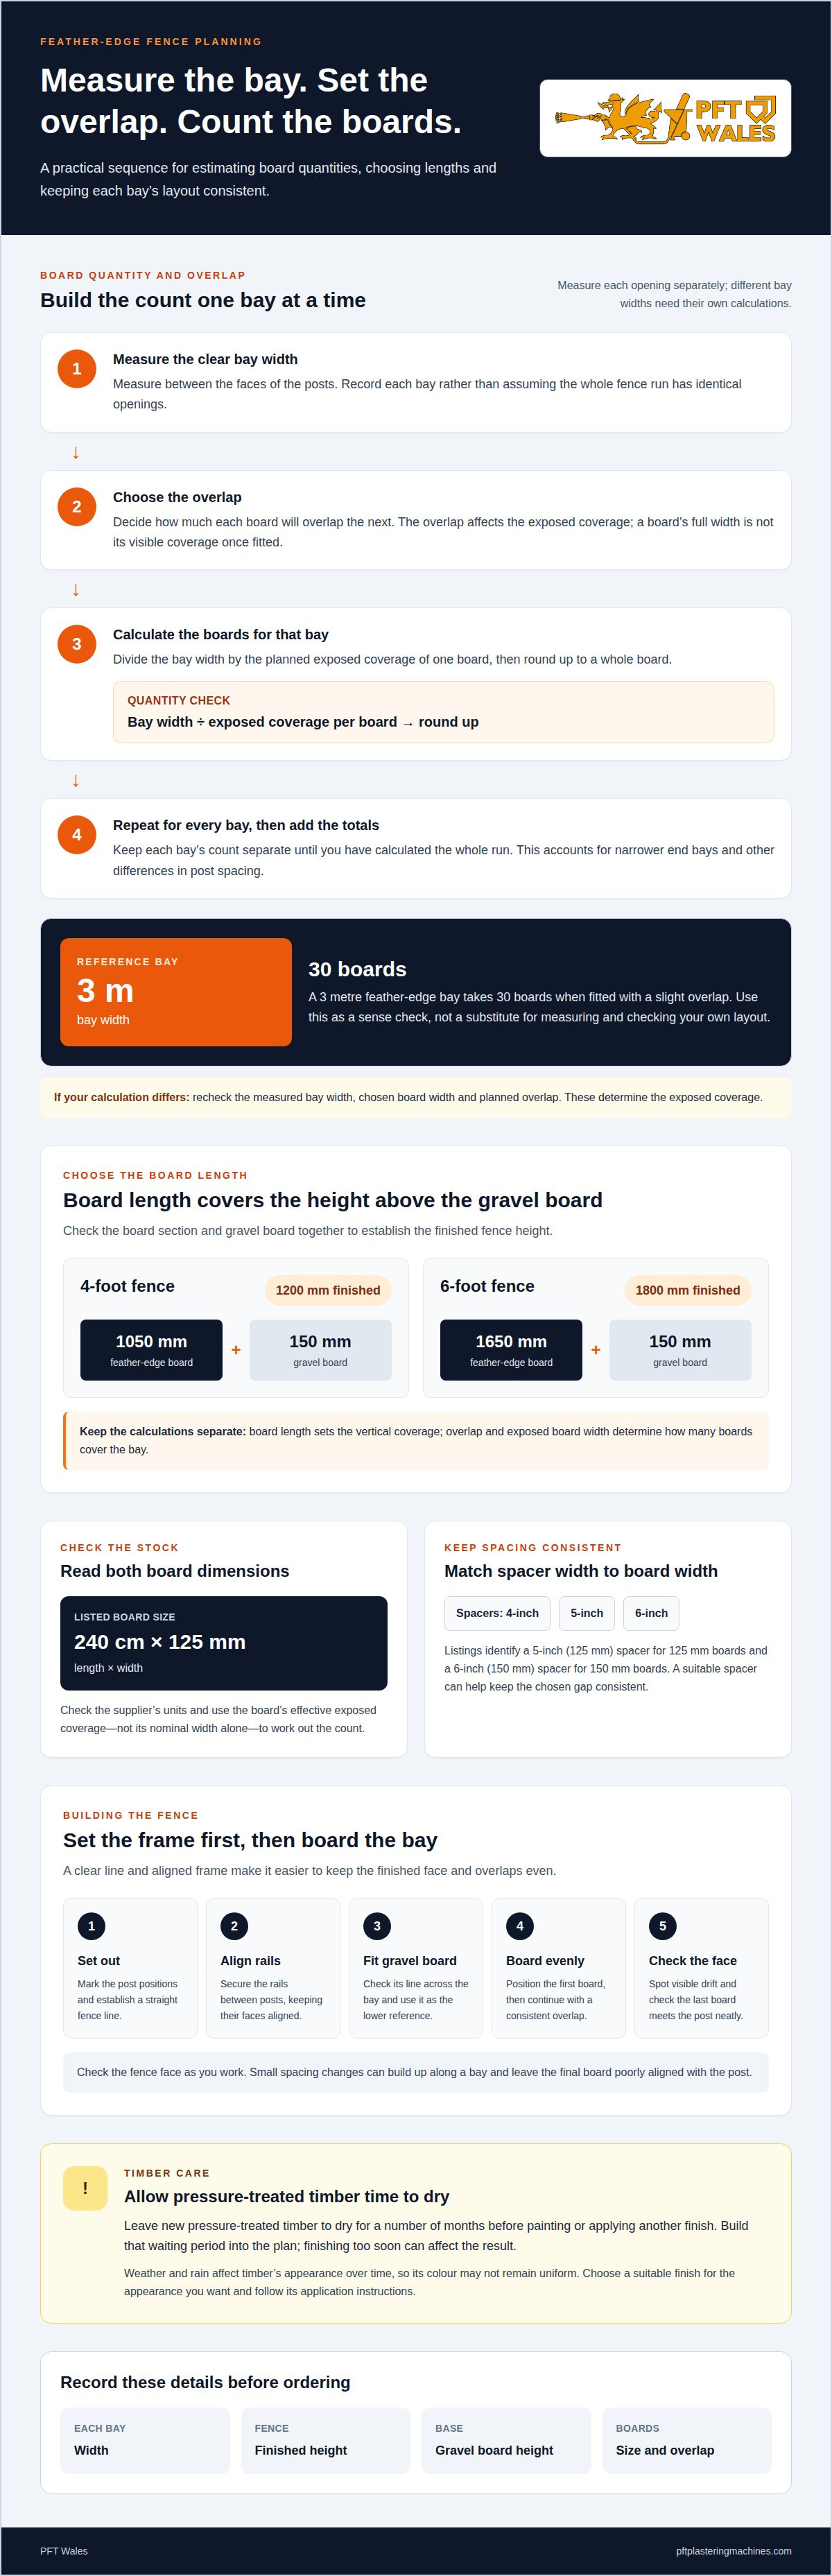
Getting the board count and overlap right starts with the bay width. A 3 metre feather-edge fence bay takes 30 boards, fitted with a slight overlap. For a 4' aluminum featheredge fence, the recommended board size is 1050 mm above a 150 mm gravel board, giving a finished height of 1200 mm (4 foot).
The overlap may seem like a small detail, but it affects how evenly the boards cover each bay. Fitting the boards is only part of the job: timber treatment and weathering also influence how the finished fence looks over time.
This guide explains how to estimate the number of boards for each bay, plan the overlap and choose board lengths for common fence heights. It also covers when to treat new pressure-treated timber, why it needs time to dry first and what to expect as it weathers. A few checks before installation can help you order the right amount and achieve an even finish.
Key Takeaways
- Use the bay width and the intended overlap to estimate your board quantity, rather than relying on the fence’s finished height alone.
- A 3 metre bay takes 30 feather-edge boards when fitted with a slight overlap.
- For a 1200 mm fence, allow for 1050 mm boards above a 150 mm gravel board.
- Plan the board layout consistently across each bay so the overlap and finished line stay even.
- Let new pressure-treated timber dry for a number of months before applying paint or another finish.
Board quantity and overlap per fence bay
Start with the clear width of each fence bay, measured between the faces of its posts. A 3 metre feather-edge bay takes 30 boards when the boards are fitted with a slight overlap. Treat that as a practical starting quantity for a bay of that width, then check the actual post spacing and board layout before ordering. If the fence run has several bays, work out each bay separately rather than assuming every opening is identical.
The overlap determines how much of each board contributes to the finished coverage. Its full width is not the same as its visible coverage once the next board overlaps it. To estimate the quantity, divide the bay width by the planned exposed coverage per board, then round up to a whole board. Keep the overlap consistent along the bay, and base the calculation on the actual layout rather than the board’s nominal width alone.
Use this sequence to build a count for a fence run:
- Measure the clear width of each bay between its posts.
- Set the intended overlap and work out the exposed coverage for one board.
- Divide the bay width by that coverage, then round up to a whole board.
- Repeat the calculation for every bay, and add the bay totals.
The 3 metre example provides a useful sense check: its recommended quantity is 30 boards with a slight overlap. If your own calculation differs, check the measured bay width, the chosen board width and the overlap. Those are the details that change the exposed coverage. Don’t apply a single count to a run with different bay widths; a narrower end bay needs its own calculation.
Choosing boards for a 4-foot or 6-foot fence
Finished fence height includes the gravel board, so choose the feather-edge board length to suit the section above it. For a 1200 mm, or 4-foot, fence, use 1050 mm boards above a 150 mm gravel board. That combination gives the stated finished height. A 4' aluminium featheredge fence should therefore be planned around the board section and gravel board together, not by choosing boards that each match the full fence height.
For a 1800 mm, or 6-foot, fence, use 1650 mm boards with a 150 mm gravel board. The same approach applies: add the board length and gravel board height to check the overall dimension. Keep the height choice separate from the bay-width calculation. Board length establishes the vertical coverage, while overlap and exposed board width determine how many boards cover the bay.
Check board sizes and spacer widths
Feather-edge boards are sold in different lengths and widths, so read both dimensions when selecting stock. A listed board size is 240 cm long and 125 mm wide. Check the listed width in the units used by the supplier before selecting stock. A board’s nominal width helps identify the product, but the overlap still controls its effective coverage across the fence bay.
Fence board spacers are offered for 4-inch, 5-inch and 6-inch board widths. Listings also identify a 5-inch (125mm) spacer for 125 mm boards and a 6-inch (150mm) spacer for 150 mm boards. A spacer can help keep the chosen gap consistent as the line progresses. Match the spacer width to the board width, then maintain the same overlap across each bay.
Before ordering, record each bay width, the fence height, the gravel board height and the selected board size. Use the 30-board figure for a 3 metre bay as a reference, not a substitute for measuring. For 4-foot and 6-foot fences, the specified board and gravel-board combinations provide the finished heights. A clear schedule keeps the quantity calculation tied to the actual fence layout.
Building featheredge
A sound featheredge fence starts with a stable frame and a clear line. Set out the posts to suit the planned bays, then align the rails between them. The rails provide fixing points for the boards, while the posts support the fence structure. Check the frame is aligned before boarding: correcting a twist becomes harder once the overlapping boards cover the rails.
Fit the gravel board along the base before fixing the featheredge boards. It creates a defined lower edge and separates the boards from the ground. Keep its top edge level across the bay and use it as a reference for the first board. Choose a board length to suit the exposed fence height above the gravel board, not the full height from ground level.
Work through the build in a steady sequence:
- Mark the post positions and establish a straight fence line.
- Secure the rails between the posts, keeping their faces aligned.
- Fit the gravel board and check its line across the bay.
- Position the first board, then continue with a consistent overlap.
- Review the finished face and correct any visible drift before moving on.
Featheredge boards taper across their width, so their orientation affects how they sit together. Keep the overlap consistent as you place each board. A fence board spacer can help maintain an even gap, provided it suits the board width. Avoid allowing small spacing changes to build up: repeated shifts along a bay can leave the last board poorly aligned with the post.
Use the frame as a guide rather than forcing the boards into a crooked line. Check the fence face from the side as you work. This makes uneven overlaps and a wandering top edge easier to spot while adjustments are still straightforward. At the end of each bay, check how the last board meets the post. A tidy finish depends on the overall layout, not just on covering the final gap.
Timber care starts before you apply a finish. Leave new pressure-treated timber to dry for a number of months before painting or applying another product. Finishing it too soon can affect the result because the timber still needs time to dry. Build this waiting period into your plans rather than treating painting as an immediate next step.
Weathering continues after installation. Rain and changing outdoor conditions affect timber’s appearance, so don’t expect its colour to remain uniform. Choose a suitable finish for the appearance you want and follow its application instructions. Treating boards before fixing makes all faces easier to reach; treating an installed fence may require careful access around the overlaps and rails.
Keep the boards and finish consistent along the fence. If you need replacement boards later, differences in exposure and weathering may make them look different from the existing fence. Test the finish on a timber sample or offcut before applying it across the whole structure. Allow the sample to dry fully, as its appearance may change while the coating settles.
Before you finish the build, inspect the fence line, board overlap, gravel-board edge and visible fixings. Check for loose boards, exposed gaps and uneven ends. Plan timber treatment around the drying period instead of coating new pressure-treated boards straight away. This final review brings together the frame, installation and care the fence will need as it weathers.
PFT Wales
PFT Wales supports trade professionals with equipment and technical guidance for plastering and rendering work. If your work spans fencing and finishing trades, its range includes PFT machines, Refina tools, Skimflex tools, and PFT machine parts and spares. The right equipment depends on the task, so share the work you’re planning and the equipment involved when seeking practical guidance. For machine-related questions, PFT Wales can help you identify a suitable next step without confusing that advice with fence-board quantities or timber treatment. If you need guidance on PFT equipment or parts for your trade work, contact PFT Wales.
Plan the next stage with confidence
Carry the decisions for your 4' aluminum featheredge project into a clear job plan. Record the selected materials and finish together, so the specification stays consistent from ordering through installation. Keep any separate trade equipment requirements distinct from the fencing work.
For questions about PFT equipment, contact PFT Wales with your requirements. A well-organised plan gives you a practical starting point and helps keep the work moving.